

Kerbal Space Program: How to build your own Formula 1 car
As a pretty big Formula 1 fan, it was only a matter of time until I did my best Adrian Newey impression and attempted to build an F1 car in Kerbal Space Program. Surprisingly, I was able to get some pretty good results quite quickly. Here’s how I did it…
The go-to analogy when explaining the aerodynamics of a Formula 1 car is that the wings are like an upside-down aeroplane. When we built a plane, the wings were slanted downwards to push air under the aircraft and create lift – in this case, the wings are going to slant upwards to push the car to the tarmac and increase grip.
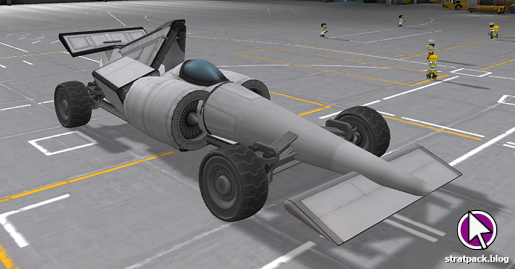
KSP has built-in wings that can be rotated to suit our needs, which means the main challenge is to arrange all the other necessary components into a vaguely F1 car-type shape and fill in the gaps with panels. I based my design on photos of the 2016 Mercedes (I’d just seen the photos of Nico Rosberg and his father driving around Monaco), but as you can see, the end result could be just about any car from the modern era.
What lies beneath
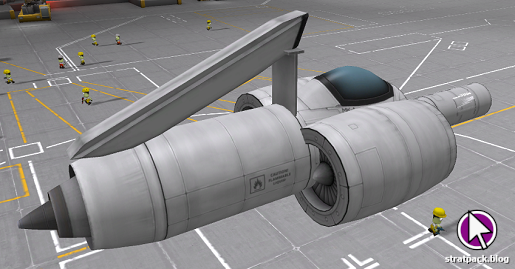
After beginning with the cockpit – which is a step further than the halo, I know – I put a big fuel tank directly behind it and a few smaller tanks in front to form the underlying structure for the nose. Next up were some air intakes to feed the engine: two jet intakes either side of the cockpit and one vent above the headrest, running to the rear.
The engine itself is a jet engine right at the back of the car, sticking out just below the rear wing. With the fuel, the air intakes, and the engine in place, you’ve got everything you need to generate the required thrust. The wheels are another critical component – for an F1-style setup, turn off the motors on the fronts and deactivate steering on the rears.
Panels, wings and nose cones
Now it’s time to make the build look a bit more like an F1 car. The nose cone, which is actually a tail piece, sits nicely over the fuel tanks in the front, while I used various aerodynamic pieces to form the right kind of shape at the back. As I mentioned earlier, the wings are built-for-purpose KSP parts installed upside down to generate downforce.
The important thing to note during all of this is that you must deactivate the control functions of all these pieces or your car will be incredibly unstable. The wings on a Formula 1 car are static (with the exception of the DRS flap, but that’s a different story), so all movement should be disabled – there are no on-the-fly adjustments here.
Going for a spin
Now it’s time to take to the track – or the runway, in this case. The one downside of this project is that there aren’t many places to drive in KSP once you’ve sped down the runway and explored the KSA campus. It turns out F1 cars don’t perform too well when you run them on bumpy grass areas. In fact, they are quite prone to exploding.
After your first run, it’s time to make adjustments, just like a real-life team would. The ride height, camber, and front and rear wing angles are all settings that can be changed quite easily but can have a big effect on your car’s performance. With a few tweaks I was able to get my Mercedes recreation accelerating, braking and cornering quite reliably.
That’s pretty much all there is to it! While my plane project was more of a challenge than I expected, building a functioning Formula 1 car in Kerbal Space Program was actually easier than I thought it would be. But as always, if I’ve missed anything out, or you have any ideas for improvements, please let me know below in the comments.