

Kerbal Space Program: How to build and fly a plane
After getting a couple of satellites into orbit in Kerbal Space Program, I decided I wanted to take to the skies in a plane. I saw this as walking before I ran, but it was surprisingly tricky to get a balanced plane out of the hangar and into the air. Here’s what I learnt…
Learning the theory
Yes, you read that right – to get a plane off the ground in Kerbal Space Program you’re going to need at least a passing knowledge of aviation and aerodynamic concepts like thrust, lift and drag. Without this foundation, your builds will be nothing but hit-and-hope blind trials.
Luckily, the best in the business – NASA – have a site they call the Beginner’s Guide to Aeronautics that explains all of these theories and how they apply in practice across passenger aircraft, military aircraft, and of course space flight.
If that sounds too much like homework, try watching EJ_SA on Twitch. He’s usually working on some kind of KSP project, is very knowledgeable, and – if you’re lucky – might even answer any burning questions you have. That said, there’s a lot to be learnt just by watching.
Building a plane
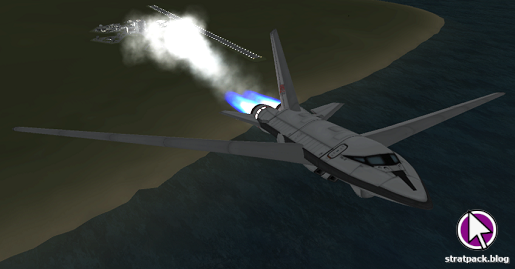
You definitely know roughly what a plane looks like. You’ve probably got a foundational knowledge of aeronautics. You can pull up a reference photo of an F-16 or a Boeing 737 in a few seconds on Google… And that’s all you need to get started on your own design.
Start with the obvious stuff like the cockpit and the fuel tanks that make up the body, and add some wings. These need to be proportional to the size of your plane, and slightly angled so they push air under the plane and create lift to help you get off the ground. Add some flaps towards the ends of the rear side of the wings so you can control the plane in flight.
Now for the engine. Attach a jet engine (or two) to the rear end. This engine will require air intakes, which I usually position on both the top and bottom sides of the wings close to the centre of the plane – they can go elsewhere, but this looks neat.
Next, attach some landing gears. The rear wheels should be located on the underside of the wings, close to the centre of the plane and just behind the centre of mass. The front one, as the name suggests, goes at the front – just make sure it’s straight!
Lastly, add a tail and some winglets at the rear. There’s no magic formula I can give for this – it’ll likely take some testing to work out what the optimal position and angle is for these. Make tiny tweaks each time and see what works best.

Testing your build
Now to the exciting part: testing. Even if you followed your reference material as closely as possible, chances are there will be a slightly misplaced component or some quirk of the KSP physics model that will give you some trouble in the air (or on the ground).
Can’t take off? Try adjusting the angle of the wings to create more lift and move the wheels to angle the front end up more. Finding the plane hard to manouever? Play around with the positioning of your wings, tail, winglets and flaps until things get smoother.
There’s no silver bullet for any problems you might encounter with your plane, but this is where your foundation in aeronautics comes in. Think about airflow, thrust and drag and why your build is fighting to move in the particular direction it is. Then adjust accordingly.
Getting off the ground
With a tuned build you should be ready to do some flying! You should know roughly how this works, but here are some tips that I’ve picked up both through my own test flights and from various forum posts and videos online. Have fun!
- Apply the throttle slowly. Go too hard and you risk spinning your plane on the tarmac or losing control very close to the ground, which is never a good thing.
- Tap the controls. Even the best-built plane is fiddly in KSP, and even a hint of anything rash on the keyboard can send your creation into a spin it may never recover from.
- Use SAS to your advantage. In the same spirit as the point above, activating SAS helps to nullify any of those problematic, slightly-too-sharp button presses.
- Use Alt to adjust your trim. Holding this key down while maneuvering will adjust your default trajectory, which can be useful to keep things stable if your design is slightly imbalanced and likes to lean backwards or forwards, like mine usually do.
- Don’t go too high. It can be tricky – even impossible – to stay perfectly level, but keep one eye on that height meter. If you get too far into the atmosphere your engines will lose their oxygen supply and fail. For this reason, I try to keep below 8,000 metres.
Hopefully these pointers are handy to anyone facing the same challenges I did, but if you disagree or have some more advice that I’ve missed, please let me know in the comments!